Sunday, August 7, 2011

Living Space - Outdoor Kitchen

In it's original configuration, the side passage housed the BBQ and potting accouterments (the homeowner is an avid cook and gardener). I sought to bring together both of these endeavors by creating an outdoor kitchen and potting bench that flanked the BBQ. I took the 'outdoor kitchen' one step further by adding a sink with running water and shelves that would in normal circumstance hold utensils. Here, they hold plants. The final touch were the lights that come on automatically at dusk.

If the look seems industrial, it's because the wood is Pressure Treated, the hardware is galvanized and the counter tops are Stainless Steel. All materials that were chosen to withstand the vagaries of Canadian weather.

The plumbing is simple, and can be disconnected before the first frost. The drain has no P Trap as there are no sewer gases to hold back. The drain pipe runs to the rear of the garden and is perforated along it's entire length to irrigate the garden as it drains.

Outdoor Kitchen

Close Up

Kitchen Sink with running Water - Stainless Steel countertops were custom fabricated by a local plate shop

Simple plumbing allowing disconnection in winter

Garden irrigation

Night shot with lights

Another dusk shot

Dhiraj

If you are looking for solutions for your home, contact us about our design, build & decorate services.

Deck Build - Side Passage - A/C Cover

This is a cover that I built for the A/C. It also hides the existing plumbing that I moved down to the unit's height. The cover is removable and can be moved should the A/C require servicing.

Before - Old and oxidised A/C unit

After - All covered up... 

Adequate venting from the side allows the unit to breathe

From Below - Louvered section allows for air to blow through

Dhiraj

If you are looking for solutions for your home, contact us about our design, build & decorate services.

Deck Build - Side Passage

This deck was initially not planned for. I convinced the homeowners to allow me to remove the steps from the garage and the back door and install a single platform step that would allow easier access to the garage from the back door without having to step down and then up again. The homeowner then asked if I could build a surface deck to cover the aged patio stones. Sure I could.... and I did!!!

Here are some before and after pictures.

Before - Uneven concrete pavers - some broken, most cracked down the center.

Before - 2 mismatched sets of stairs. One wood and the other concrete. Heights did not match. The wooden one was loose, causing a trip hazard.

After - A larger platform step at the rear make entry and exit into the Garage or House, a Hands-Free affair. The A/C unit has since been covered and the hose relocated.


A Before and After View of the space

Details - Top Left, Gas BBQ hookup - Top Right, Window well wrap - Bottom Left, Power Ingress - Bottom Right, Gas shut off


More to follow on this space......

Dhiraj

If you are looking for solutions for your home, contact us about our design, build & decorate services.

Saturday, August 6, 2011

Deck Build - Front Porch

Just had the time and the inclination to blog one of the projects that I had completed a while ago. This is a low deck that I built for a customer. We went with a lower height that removed the need for stairs and had just one step up to the main door. Concept, design and execution by myself (non-shameless plug!!!) I'l let the pictures do the rest of the talking.

Looking from the driveway towards the main door. This Deck has a width of 18 feet and a depth of 8 feet. The extra deep and wide stair at the top allows for easy entry and exit into the house.

 Looking from the front. The Power Auger that was used to bore the holes for the footings, tore up the lawn. This has since been remedied by the homeowner.

Closeup of the step.

 I wrapped the first three courses of Deck boards around the outside perimeter of the deck. I did this for two reasons. The first is to ensure that no raw edges or board ends are visible. The second is so that I could used full 16' lengths thereby removing the need to have butt joints on the entire deck. The real other reason is that it just looks damn good!!!! All board edges were routed with a 1/2" round-over bit to match the existing profile on the deck boards.

A few days later, the homeowner had already planted trees, mulched, composted, reseeded and decorated the deck.

At dusk, recessed LED lights illuminate the deck around the step......

and the perimeter....

Dhiraj

If you are looking for solutions for your home, contact us about our design, build & decorate services.

Sunday, April 10, 2011

Basement Build - Drywalled, Mudded, Taped & Primered

I keep forgetting to carry my camera along and did not get pictures of the basement being drywalled and the separate taping and mudding sequences. I drywalled all by myself, but got in the pros for the taping and mudding. My carpal would not look too kindly on the pressure on my wrist. It took almost a week for the  basement to be completely taped, but the result is nothing short of amazing.

I primed soon after, and these are the pictures after the first coat.

West wall and television alcove 

South wall 

East Wall 

North Wall and looking towards the passage and entrance  

Looking into the passage

The passage

Dhiraj

If you are looking for solutions for your home, contact us about our design, build & decorate services.

A Stain in the Glass

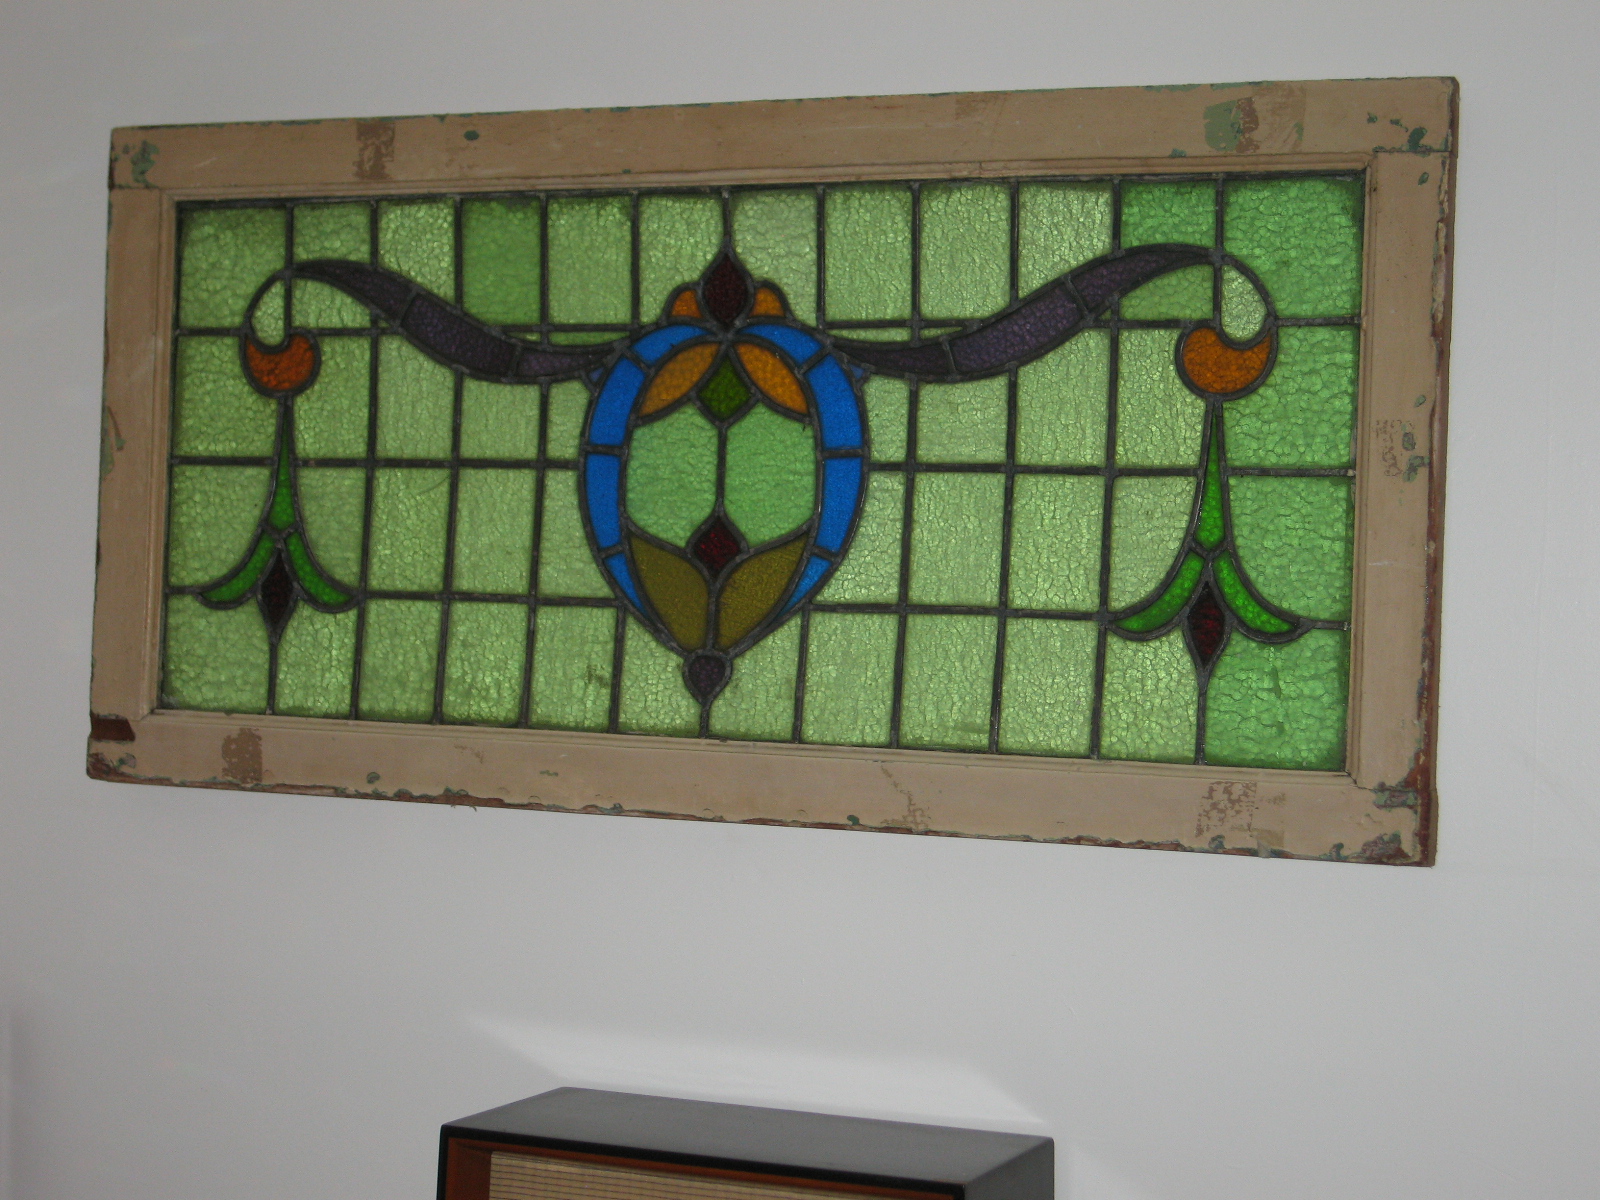
I have been, since the past 6 years, moving around three stained glass panels. These were shipped to Dubai  from Bombay, then to Bahrain and finally to Canada. They are the last remaining fragments of what was once 'Carl Villa' - the house that my grandmother lived and passed away in. The house was a family property that sheltered four families. My grandmother lived on the ground level facing North. The house holds a special place for me as I lived there with my grandparents for a couple of years as a child. After that we (my brother & I) passed by every morning on the way to school to greet my grandparents and stopped by after school for lunch before journeying onward to Bandra and home.

When the house was finally sold to developers and the building was being demolished, I convinced my mother to save the stained glass panels for me. It took a lot of doing, but the carpenter managed to get them out in one piece.

We decided not to have the units refinished as they so have much history. Every layer of paint probably contains volumes of stories about the good and bad times in Carl Villa. It also probably contains lead!!!!

So. They've been sitting in our crawl space, while we've tried to figure out the best place for them to go. This evening Lynda played around with some newspaper templates and we agreed on a suitable location. On account of the weight of the panel, I had to go with a sturdier method of hanging it on the wall than just D hooks or wire.

I ripped a piece of 3/4" ply and ripped it again down the center at a 35 degree angle. The angle was not so important, I just needed a mating pair.

Here in pictures is the process and outcome.

The template on the wall

Stained Glass panel on the table


1st part of the bracket on the wall

 Mating unit and spacer at the bottom affixed to the panel

 This is how the wall part looks when affixed to the wall

Mating part fixed to the panel

 And dropped in place

 The panel on the wall

Close Up

Dhiraj

If you are looking for solutions for your home, contact us about our design, build & decorate services.

Thursday, March 10, 2011

DIY Ring Flash

Just started building my ring flash which I believe will work great for macro and portraiture. It's not something that I need, but more of something that I'd like to make just to see what the results will be.

I'm following instructions from Craig White and Roy Niswanger and making modifications of my own based on locally available supplies.

The first thing that I had to change was the main reflector. Both the instructions call for a 11 inch clamp reflector shop light. Couldn't find this anywhere, so I subbed it with a 12 in stainless salad bowl from the dollar store. I had picked up the duct reducer some time before and I made the hole in the bowl to mate the two together. I've only just started cutting out the hole where the flash will fire through. Will post those pics as the project commences.

As I already have the off camera flash and the TTL sync cord, I expect that the entire build will come under CAD 15.00. Compare that to some of the professionally available flashes which start at USD 100.00.

 Salad Bowl - No Frills Dollar Store section. CAD 2.00

Don Park 4"-5" HVAC Duct Reducer CAD 9.50. I thought this pricey

Reducer on Bowl action - Templating in Nerdspeak

Cutting the opening for the reducer to fit

Methinks this is a neat cut

Test fit

Basement Build - Schlepping Drywall

For the past couple of weeks I've been busy building a basement for a customer in Brampton. The layout was done in conjunction with the homeowners. The framing has been done, wiring complete, insulation done and vapor barrier installed. Time for drywall - EXCEPT - with a 36" wide stairwell with a 180 degree turn, the drywall just would not go down in it's existing state. Cutting it in half would double up the butt joints as well as the cost of the mudding and taping which is to be subcontracted.

I decided after perusing many forums, to lift the carpet, remove a section of the sub-floor between the joists and pass the drywall down into the basements. It worked like a charm, but it's not a job that I'd like to undertake anytime soon. This operation was only possible as the floor was carpeted. Were it to be hardwood or tile, I would be forced to cut the drywall in half and go the route of the costlier mud and tape.

My cousins helped me do this and without them I would have been well and truly stuck. Thanks guys. You know who you are.

Getting started - This will be the TV wall. Have to work around the plumbing stack. Planning to convert an obstacle into a feature 

Probably the only straightforward wall in the entire room

Awkward ducting and another plumbing stack to work around

West wall insulated and complete

There's a lot of stuff in this picture, but I turned that plumbing stack into a feature. I bumped  out the wall on the opposite side thereby creating an alcove for the TV and Media Cabinet

This wall was pending final connections to the octagonal boxes that will hold the wall sconces 

Hated the way that this came out, but I had no other option. The ducting could not be reworked on account of the way the load bearing beam and the way the floor joists ran

Finally - the hole in the floor

A different vantage - and me. That's Dan the Man to the side (wondering what he got himself into this time) - It's official - I have the greatest cousins in the world.

Tuesday, March 1, 2011

Confessions of a Leg Man

I'm desperate for a piece of furniture for our entryway. A counter height chest of drawers that will hold our ever growing collection of gloves, scarves, toques, et cetera. In summer, it will be helmets and the additional protection that comes from introducing the offspring to cycling, skateboarding and rollerblading.... It would have legs that would accommodate our winter boots in winter and roller blades in summer.

In an attempt to amalgamate my Champagne taste with our Tap Water budget - and the oddly sized (over 3 feet but not quite 4) space that is our entryway, I am left with the only option available. Do It Yourself.

As if I needed a reason!!!

So inspired by the Edland series at IKEA, I set about gathering my supplies. Only to find out that Queen Anne legs cost upwards of CAD 25.00 per foot. I know you're a Queen, but really, Anne!!!!!!!

So it was off to the various Thrift stores to find some poor piece of furniture to cannibalize. First stop, Goodwill. Ooooh there's a 50% sale on as well... This just gets better. Long story short. Found a table for CAD 10.00. Paid 5.00 at the till. Took it home and took it apart.

Got myself a set of four Queen Anne legs at CAD 1.25 per leg. Add to the fact that they're Oak.

The IKEA Edland Nightstand that is my jumping off point

 My Goodwill find - She (if tables are feminine) has no idea what her future is to be

Related Posts Plugin for WordPress, Blogger...