Showing posts with label Mad Hacks. Show all posts

Saturday, November 25, 2017

Wilde North SHOP - Tigerwood Pond Table

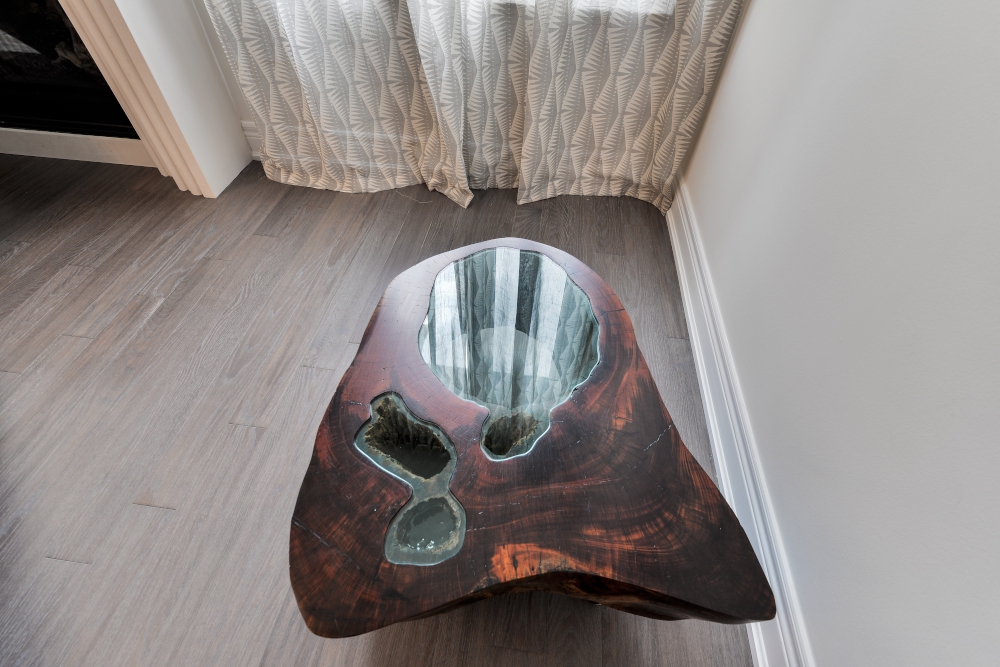
We recently had the opportunity to re-purpose a section of a Tigerwood stump into a custom end table for our client. Leading from the success we had with that we've decided to make them available in our Online shop. The Pond table has been designed & created by Dhiraj with an aim of optimizing on the natural features of the tree stump. Our clients were presented with this unique piece of wood by one of their friends and were using it as an object d'art. We were asked to come up with something more practical with the piece whilst retaining it's natural beauty.
tree stump table
The stump had naturally rotted out cores that were cleaned out previously by the lumber yard. The stump however was chainsaw cut and was not level on any of it's sides. The first call to action was to identify the main side. We actually chose the side with the most rot and decided to make a series of ponds, almost in homage to the 30,000+ lakes in Canada. 

live edge table
Once the top was identified, we made a special jig to flatten the surface with the aid of a router. This was a time consuming process, but one that was very important for the next step. Once the top was flattened, we traced out the openings and enlarged the pattern prior to getting custom glass cut to size. We then carved out a rabbet into which the glass would sit making it flush with the wood and lending the appearance of a larger and smaller pond. 
tree bark table

Pond table

glass template

Adjustable legs from Lee Valley allowed us to accommodate the varying heights of the base and a few coats of Wipe on Polyurethane will protect the table from abuse.

table legs

stump core


lacquering table
This was a unique piece and cannot be replicated. We will be on the hunt for other unique stumps to convert into side and coffee tables. Watch this space as we show you behind the scenes on custom furniture we will be creating. We are excited for this natural expansion of our biz and can't wait to see what it leads to.
custom live edge table

custom made table

coffee table


pond table by dhiraj dsouza

Thanks for the support and encouragement you always show us on every project we reveal. Today is Small Biz Saturday and we are extremely grateful to you for supporting our little biz. We love what we do and want to continue doing it.

Check out more of our work on our WEBSITE or our INSTAGRAM where we share our daily escapades.

WWW.WILDENORTH.COM
Big hugs
Dhiraj & Lynda

Tuesday, February 17, 2015

How To Decorate A Small Foyer

Our Semi has a tiny foyer and with a space this small it's best to go over the top with decor. We decided to paint the focal wall a happy turquoise blue and ordered these gorgeous filigree decals from Blik. The opulent Venetian mirror sits above a distressed bench and is the perfect pairing of contrasts. The mirror is from India found in a small mirror shop on the streets of Bandra - I spotted it from a moving taxi and went back for it (and now you know my super power!).

While strolling around our neighborhood in Dubai, we spotted an old discarded bed on the curb. We both loved the headboard design and so we carried it back home on our shoulders. Soon after D cut it up and turned it into a sweet bench. Here I have dressed it up with a faux fur rug just to soften all the wood.

I wanted somewhere to hang the hats and we got this pretty wrought iron rack at a garage sale here which I dressed up with some of my beaded necklaces. It goes perfectly with the filigree decals.

This is what I love about our home. It has pieces from all the countries we have lived in and each piece has a story. Really it doesn't have to cost a bomb to decorate a home. Vintage pieces, garage sale finds and re-purposing stuff can do the trick. You just need a little imagination and a lot of love ! 

Do you have any foyer concerns? Feel free to pick my brains on design solutions for small spaces.


Hugs
Lynda

If you are looking for solutions for your home, contact us about our design, build & decorate services.

Friday, July 12, 2013

Camping Balls

It's always good to have an additional set of balls when camping. Not the ones that generate that oh so required testosterone, but these ones....
 

I took a used softball (courtesy +jb baptista) and drilled a 13 mm hole right through. I then inserted a length of rope with knots at both ends that hold the ball and rope together.

This will make slinging ropes through the trees an easier task.

Dhiraj

If you are looking for solutions for your home, contact us about our design, build & decorate services.

Thursday, March 10, 2011

DIY Ring Flash

Just started building my ring flash which I believe will work great for macro and portraiture. It's not something that I need, but more of something that I'd like to make just to see what the results will be.

I'm following instructions from Craig White and Roy Niswanger and making modifications of my own based on locally available supplies.

The first thing that I had to change was the main reflector. Both the instructions call for a 11 inch clamp reflector shop light. Couldn't find this anywhere, so I subbed it with a 12 in stainless salad bowl from the dollar store. I had picked up the duct reducer some time before and I made the hole in the bowl to mate the two together. I've only just started cutting out the hole where the flash will fire through. Will post those pics as the project commences.

As I already have the off camera flash and the TTL sync cord, I expect that the entire build will come under CAD 15.00. Compare that to some of the professionally available flashes which start at USD 100.00.

 Salad Bowl - No Frills Dollar Store section. CAD 2.00

Don Park 4"-5" HVAC Duct Reducer CAD 9.50. I thought this pricey

Reducer on Bowl action - Templating in Nerdspeak

Cutting the opening for the reducer to fit

Methinks this is a neat cut

Test fit

Saturday, February 12, 2011

These Two Are Not The Same

So. I really needed a small table tamp to illuminate my workspace, especially my keypad. Lynda had one from her old office, a DHL LED lamp with a built in 4 port hub. It was Red and Yellow. I said 'was' as it is no more. Lynda made it clear that it would not be sharing our desk with us. Hey. I was not to keen on the unit, but it worked.....

Anyways, a trip to the ReStore got me a Retro Fabulous Desk lamp for 50 cents. It worked all right, but it was an incandescent job that ran off a wirewound transformer. Not exactly great for the 'Blue Marble'.

I decided to cannibalize the DHL lamp and transplant it's newer guts into the older lamp. Don't have any pics of the work being done, but it was quick and dirty. But the end result is great. The styling of the older unit is very Mid Century, while the newer one just looked Middle China!!!!

Judge for yourself.

 
The DHL one looks awful in comparison. 

From the front

Here it is all wired up and connected to the USB port on my laptop. This is my new workstation. Lynda and I share a 10 foot long table. When completed and finished, I'll do more detailed pics.

It's been really long since I last blogged. I've had to get the basement insulated in time for the Eco-energy audit and I have just 8 feet of the far wall of the crawl space left to go. It's not the best place to be working when you have only 4 feet of headroom and you spend most of the time in a crouched position. But there is already a noticeable difference in the temperature in the basement. Next week, I get someone to blow insulation in to the attic and I'm ready for my audit. Should be fun.

Sunday, March 21, 2010

DIY Selective Focus Lens


If you've ever seen photos from Selective Focus Lenses, you'd know what I'm talking about. Pictures where parts of the image even though in the same plane are completely blown out of focus. Sure you could go out and buy yourself a production lens. Lensbaby makes a range that start at USD 100+ for plastic optics and USD 300+ for glass optics. Canon and Nikon make Perspective control or Tilt-Shift that cost in the thousands. That's money better spent on other stuff. Besides..... where's the fun?????

I started off, as I always do, by trolling the Interwebs for information. There are a couple of ways of approaching a solution. The better of them involves getting your hands on a Medium Format Lens which even on the second hand market cost more than I was willing to spend. The other way to go is to use enlarger lenses and a quick search on Craigslist garnered me a complete enlarger replete with a 50mm and a 75 mm lens for CAD 40.00

I collected the unit yesterday and was really eager to kludge together the contraption. I say kludge, because this is exactly what I did. I harvested the lens mount with the bellows and pressed it against the SLR body to see what sort of images I would get. I threw the aperture wide open and set the shutter to 1/60 of a second and wished myself luck.

In the coming days, I will attach the bellows to a spare body cap and try to figure out a way to hold the lens in the desired position without requiring more that two hands for the entire process. I'm also looking for 105mm and 135mm lenses with M39 thread. Know of anyone who has these lying around?????

So here are the test shots, very Holga-esque complete with light leakage and everything. The images were shot around 5 in the evening of what was a very dull day. No post processing was attempted or done on any of the images.

First shot. Near the kitchen window. Tried to keep the nose in focus.

Our outdoor Chandelier. I tried to focus on the center spar

Christmas lights on the tree. The lights are all in the same plane, yet only the center light is in focus.

The hinge on my Garden Shed

This is with the 50mm lens. I had to go in really close, but I like the way it's filled the frame.

Thursday, October 22, 2009

Retro Radio Redux - Part 2

Following up to my earlier posts (MRR RSM RRR-1 RRR-1.5) I had promised a video of the unit in action. I finally managed to upload the same. Enjoy!!


Most people think that it just sits there and does nothing - then I fire it up!!!!!

Thursday, October 1, 2009

ND Magnetic Hooks

ND usually stands for Non Destructive and is usually followed by the word 'Testing' when used to describe material analysis without destroying the material in question.

In my case it stands for hooks that will affix to the walls of Lynda's cabin without the need to affix a fastener.

The walls of Lynda's cabin at work are sheet metal partitions covered with fabric. Lynda had been issued strict instructions by the building manager that no hooks of any sort would be allowed to be affixed to the panel for the purpose of hanging her frames.

I sorted through the box of magnets that I had culled earlier and isolated those that had some sort of threaded hole within the body. Using the screws that I had saved, I affixed hooks (I used the Hilti Fix hooks that are not normally sold in North America) to the magnets.

They are super strong and should hold almost anything. They're not that good looking, but it does not really matter as they will be hidden by the frames.

The hooks affixed to my fridge

Another angle showing the profile of the hooks

These hooks are part of the Hilti-Fix system that is sold in the
Middle East and Europe and are meant for fixing into concrete walls

Sunday, January 4, 2009

Turntable Hack

For the longest time, I've wanted to digitize my audio, allowing access to my 600+ (and growing) collection of CDs. At one point I even considered an iPod, with a DLO dock. That would have limited me to encoding my music in the lossless AAC format instead of the more preferred (by audiophiles) WAV or FLAC formats. I finally settled down to eventually building myself a Media Server, but was still stumped by what I was to use as a monitor to make my selections. I could have used the TV, but that would've meant keeping the TV on, and that is something that we try to keep off as much as possible.

Then it struck me. I currently have a Turntable that I like to listen to, so why not pair it up with yet another turntable (DJ style) but instead of the platter I would replace it with a monitor while keeping the tonearm and dust cover as a nod to it's heritage. 

The Donor Turntable is an old Sansui SR-222 Belt Drive that I scored from the Value Village for CAD 7.00. I felt quite bad about ripping it apart... for about 5 seconds.

But by now I would've lost you all. So why don't I just illustrate the same in pictures.

I have yet to build the Media Server, and will do so in the coming months.


With the Dust Cover open. Running Album Player. I have yet to paint the monitor Bezel Flat Black


The Tone Arm installed just for looks 


From the side. The Sansui Badge intact


With the Dust Cover closed
Related Posts Plugin for WordPress, Blogger...