Sunday, December 20, 2015

Inspiration: Design Boards

When working on an Interior Decorating gig I create multiple Design Boards to inspire the look and feel of the room. It gives the client a visual and allows them to imagine how it would be to live in that space. Here are a few I created for past clients with more on our website:

My Bohemian influences came out strong here with a classic combo of indigo blue, tan and Kilim rug making this a very eclectic and comfy room for an Artist or Creative. Brass features heavily in my repertoire and that is reflected in the coffee table brass drum, brass animal heads on the wall and the Fiddle fig pot. With Copper being really trendy right now, I picked copper pendants for the corner that went really well with the beautiful leather Arne Jacobsen Egg chair. It really is ok to use different metals as long as there is a common underlying theme and here it all works beautifully. 
A great space for the Urban Bachelor keeping it warm and cozy with leather, wood and contemporary lighting. I imagine this space a great conversation setting with upright chairs and a Mid Century Sofa accented with a gorgeous Souzani print cushion.
Oh Frida, what can I say here except that this room was heavily inspired by the great Frida herself. I imagine her lounging in those rattan recliners dreaming up her next canvas painting. Those Agate chandeliers had me hook, line and sinker. My mother used to have an Agate chandelier and I distinctly remember seeing it when I was 8 years old in our home in Qatar. You can say my design sense has come from my mother who was very Fasionable in dressing and decorating.
This one was created for the Haute Hippie herself.........namely Rachely Zoe who epitomises the 20th Century Urban Hippie. Have you seen her new line of clothing - to die for !! I've watched her TV series back to back and learned so much about the Fashion & Styling world.
Greys are still strong on the paint color trend and this Moody room was created for a space that you can entertain your guests with some Scotch or Single Malt Whisky. Those Jonathan Adler Goldfinger chairs are stunning in their structure and simplicity and inspired this room. Here are a few more Design boards I posted back in February featuring a few more grey couches.
The Retro life with a cool Mid Century Modern couch in the prettiest blue paired with a vintage Kilim rug and rattan hanging chair. The bubble chandelier brings a sense of calmness to the vibrant space. Don't be afraid to mix and match elements as here a Rajasthani Coffee table is perfectly comfortable next to the MCM couch.

I think my dream would be to own a home with a hundred rooms that I can do up in different ways. But it's just a dream...........seriously what would I do with a 100 rooms, we are not the Kadarshians !

For more Design Boards visit our website

Big hugs
Lynda 

Sunday, December 13, 2015

Birchbank Main Floor Washroom Design

We're almost done with the spare washroom that we've been building in our spare time. It's time now to make plans for the main washroom as it is in dire need of some TLC. This one will be taken down to the studs especially in the shower area as there is a noticeable leak, probably from the shower pipe itself.

We're not making crazy changes to the layout as it works just fine the way it is. We are however ridding ourselves of the cast iron tub and building a stand up shower enclosure with glass doors.

This is what the layout will look like. The plan is to use 24 x 24" rectified porcelain in the main area outside the shower. I would've liked to use stone, but porcelain is easy to maintain especially with the amount of traffic that this washroom will see.

The shower cubicle will get Marble, Wooden White, Honed tiles 12 x 24 format. Around 5' up, a Linear niche running end to end (if the framing allows for such a configuration) will house a growing collection of Hair product that comes with having two teenage girls.

The floor will be bordered by 4 x 24 honed marble, filled in with the same marble in a hexagon pattern. This will allow the tile to conform to the sloped base.
A bird's eye view of the washroom
A close up of the base. The drain was omitted from this drawing
This is the tile chosen to fill in the base. The norm is usually 2x2 square mosaic, but I'd like to do something different with this one
This is an alternative, but I'm leaning strongly towards the hex tiles
We put the two tiles against each other to see if they work. And they do.
The mirror on the wall will be Ikea's Stockholm mirror
The vanity will be Ikea's Godmorgon vanity hung from the wall. We will use a 48" unit. This brings about a problem of it's own. We do not want dual sinks, but Ikea does not make a single sink in this width. We'll have to find a workaround. I do plan to add undercabinet lighting, mainly because I can

 For illumination, the plan is to have two pendant lights on either side of the mirror. These are from Gingers. Three potlights will serve as overall illumination in the main area and two shower rated pot lights in the shower cubicle.


We normally construct benches in shower stalls. These will however upset the design on the floor. The plan is to use a Ceramic stool in the shower as these are waterproof and add an unexpected design element to the cubicle. The stool above is from West Elm 

Visit our website to see more of our Remodels

Subscribe to our monthly newsletter to get Design Tips and More straight to your Inbox.

Birchbank Washroom & Laundry Room Build - Part 9 - We're almost there

In between all of my other work, I've been slowly building a spare washroom in our basement. This will serve as the main washroom when we tear out the existing one on the first floor.

The washroom did not come about easily as the space was filled with a furnace, a 4' concrete sink and top loading laundry units. In addition to that, the water heater was located in what is our current home office. A game of design and construct chess started. I won.

So. To get started, I had to get those space hogging Laundry units out of there. But where??? I saw that I had the potential to relocate the laundry pair (albeit a new front loading pair) to the crawlspace area, just under the stairs. This would make the units take up zero usable floor space. Once we got the concrete sink out and plumbed for the washroom and the laundry (progress is hereherehere and here), I framed the washroom and outside area,

I then contracted a Tin Knocker to push the ducts closer to the stairs to give me more headroom and clearance in the small vestibule area that would serve as our new laundry area.

I then proceeded with building the laundry alcove and got Mike to do the supply plumbing.I finished building the rest of the washroom and it was then on to tiling. 

My initial purchase for the washroom was 4x12 Grey gloss subway tiles. However I felt that this would date the washroom and I opted for the more modern look of 12 x 24 matt tiles.

Schluter Kerdi was my choice of waterproofing for the walls

I wanted a full tile to line up with the sink to act as a backsplash. This took some planning, obsessing, measuring and remeasuring before setting the first course of tiles. Thankfully it all lined up.

On to the adjacent wall working towards the Niche.


Getting the holes all lined up, was a small task

Base of Niche set


It's important to maintain a 1 degree slope to drain any residual water on the bottles

Using a Bevel Gauge to get the slope transferred to the side walls

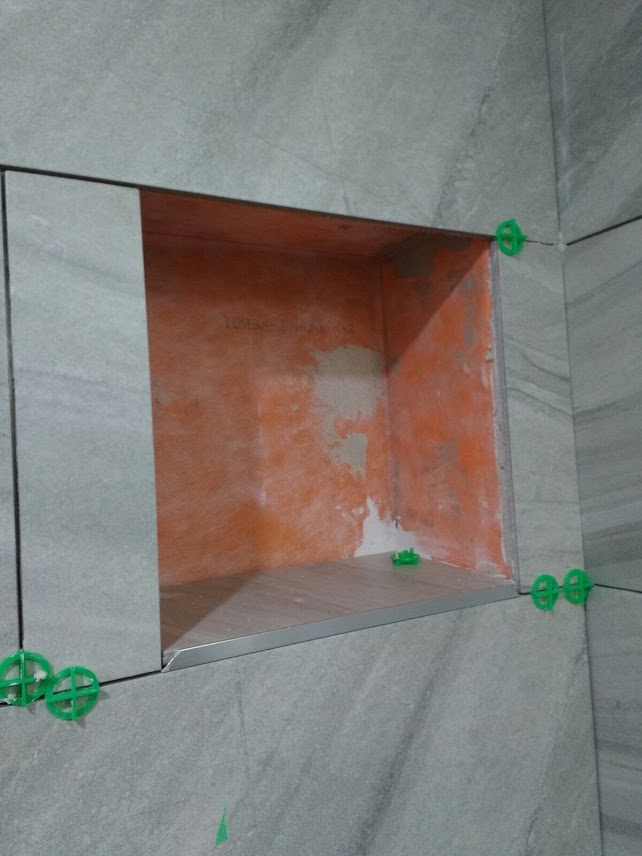
Getting the niche to fit exactly between two tiles takes a bit of planning, but the end result is well worth the extra grey hairs

All done awaiting grout

Niche detail

 All grouted. We mixed up 4 custom colors of grout to test what it would look like when dry. I wanted the grout lines to disappear and I think we almost got it.

Detail showing how the tiles line up with the sink 

 This is where the laundry pair now sit.

 Since space is at a premium here, I constructed a shelf from drywall to hold the detergents

I had some balance mosaic tile from a previous job and decided to tile the back of the cubby.

Check back to see the finished washroom with the glass shower doors installed. 

To see more of our work visit our website at 


Subscribe to our website to receive more of these design tips in your inbox

Thursday, December 10, 2015

How To Use Chalk Paint On Your Furniture

My living room has alot of heirloom pieces, antiques from ancestors that we have lovingly restored and brought back to life. While they look amazing in my eclectic Living room I felt there was just too much brown wood in one room. So one sunny day I decided to paint one of our console tables with chalk paint. I sourced out Annie Sloan's chalk paint which is a beautiful thick creamy matt finish paint that is easy to work with. The paint is stocked at only one retailer in downtown TO, a bit of a pain but well worth the trip. You can find it at Jim Connelly Studios in the heart of the city.


The paint is fairly thick so if you want you can dilute it a bit by simply adding water. Give the table a good wipe down and directly paint over the wood finish. The beauty of chalk paint is that you do not have to sand down the old finish / lacquer, etc. 

I applied two coats  on my table letting each coat dry thoroughly in between. Chalk paint dries fairly fast and I had to wait no more than 2 hours between coats. I wanted to add a little bit of drama and added acrylic gold paint to highlight some of the molding in the table edges and drawer handles. I then added 2 layers of wax and buffed it up to a soft sheen. The wax protects the paint and also adds a bit of tint to the cream color giving it that aged look.


And then the best part - dressing it up with all my vintage finds. Here a collection of leather bound books, pewter mug with silk Peonies and brass owls nest in one corner, along with a framed piece of my water color art.


The other end houses a vintage type writer and some brass candle sticks. The chair is an Ikea chair that we had recovered in Bahrain, it has taken a bit of a beating with the kids but still a loving part of our home and a reminder of our years in Bahrain.

Painting furniture is a great idea when you want a quick change in your room plus the no sanding bit had me sold on chalk paint ! With just this simple change the living room looks so much more bright and airy.

Subscribe to our monthly Newsletter where we send you more Design tips, product deals and behind the scenes at Wilde North.

See more of our Home Remodels at 

Hugs
Lynda

Tuesday, December 8, 2015

Pit Stop: ReStore Orangeville


We often step into the ReStore branches to see what has come into the showroom. Ok not often, like literally everytime we drive by one - we have to stop and check it out (#sickness). Mostly we look for antiques and vintage furniture pieces particularly Mid Century Modern designs. 

This is the ReStore Orangeville branch that had some great stuff in stock that day. ReStores stock items that sell very quickly so if there is something you are interested in you have to make the purchase immediately.


Beautiful vintage dresser, round mirrors are on trend right now.

Imagine this console sprayed in black lacquer high gloss housing your flat screen above it. Classy !

This piece had sold but I fell in love with the print of the fabric........just look at it ! 


Another console table that was SOLD ! beautiful lines.............

Some great furniture pieces that would be transformed through upholstery and a little bit of TLC.


This LP storage unit would act as a sweet side table
Theater seats in a great condition, were going for $80 only ! Would look great in a slim foyer.

When decorating I love adding one vintage or quirky element that becomes a conversation piece in the room. Wilde North specializes in incorporating Vintage and Heirloom pieces into your decor scheme giving the room character and personality and making your mother in law totally jealous ! 

For more Design Tips subscribe to our monthly Newsletter, we promise to only send you the good stuff !

CLICK HERE TO SIGN UP

Hugs
Lynda

Related Posts Plugin for WordPress, Blogger...